
Today’s post is excerpted from How to Get On Podcasts by Michelle Glogovac.
Whether you’re running for a political office, growing a nonprofit, sharing your experience or book with others, educating others on how to successfully do something, or being the light at the end of someone’s tunnel, you’re going to succeed by doing podcast interviews. Your reach is no longer relegated to just those who follow you on social media or find you on LinkedIn. You will now have the ability to reach people all around the world, and not only that, but your interview will be available for the eternity of time … at least while the internet is still around!
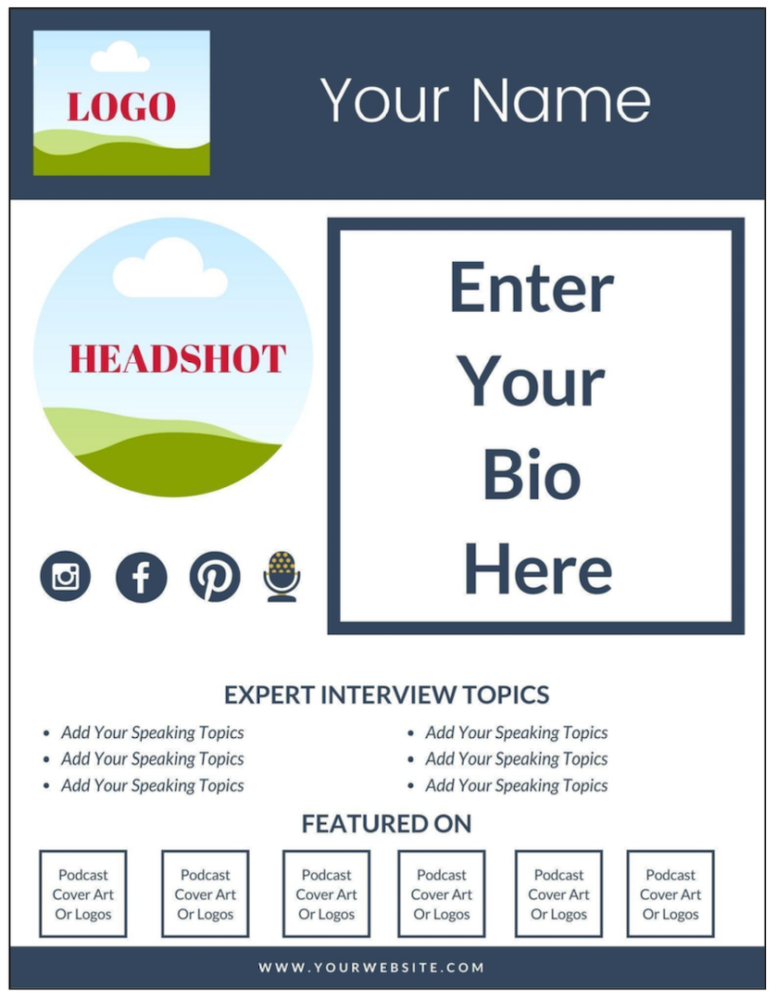
But before you pitch podcasts, I strongly encourage you to create a media kit. I use the term “media kit,” but others might refer to it as a “press kit,” a “one-page promotional kit,” your “pitch sheet,” or a “one sheet.” Regardless of the name, it’s a one-page document that ideally matches the look and feel of your brand. Its purpose is to offer everything a host needs to know about you that will ultimately make the host eager to interview you. It includes not only your bio and website but links to your social media platforms, your speaking topics, your headshot, your logo, and where you’ve already been featured. Your media kit is a one-stop shop.
Before we dive deep into how to create your media kit, let’s discuss the fact that this is promotional material, and you might be thinking that you don’t want to promote yourself. This is a common theme I hear from prospects and clients alike. I have the same answer for them as I have for you. This isn’t about you. Don’t think about this as promoting yourself if you don’t want to. Instead, focus on how you are going to educate others and share your knowledge and expertise with them so they can benefit from you. Don’t get distracted by negative thoughts of self-promotion. Your interviews are going to help others, as well as help yourself and your business.
First: track down any interviews you’ve already done.
I find that oftentimes we forget where we’ve been interviewed, so do yourself a favor and go Google your name. You can add “podcast interview” or just “interview” in the search bar to help narrow it down. (Tip from Jane: Listen Notes is a good way to search only podcasts, if needed.)
Create a list detailing every interview—whether it’s print, audio, or video—with a link. You’re going to use this information in your media kit. Even if you’re just getting started on your interview journey, chances are there is some sort of recording of you online, whether it was for an interview or a webinar or course you participated in. At this point it doesn’t matter if it fits with the topics you want to be interviewed about; we just want to be able to offer an example to hosts that shows you’re capable of having and holding a conversation.
In the PR world, we refer to “press” as any outlet that mentions you or interviews you. Press includes websites, both digital media outlets and blogs where you have been quoted or have actually written the post, and print media, such as newspapers or magazines, radio interviews, podcast interviews, and television interviews.
For any press that you’ve done, find and copy the link for the interview or where your name is mentioned and also download the logo or graphic art for the outlet. For podcasts, you can google the name of the podcast and then go to “Images” and right-click to save the cover art. Keep all of these in a folder, and give them recognizable file names so you can find them easily. You are going to use these graphics in your media kit. Logos and cover art are more recognizable than text titles and names. Images also tend to take up less real estate, and you need to present a lot of information on one page.
Ensure your media kit feels like you
Your media kit should look like an extension of your website or the branding of your logo, whether that’s for your business or personal brand. When someone looks at your media kit and then checks out your website, there should be no difference in look and feel. This is a part of your brand and who you are. This is what the term “brand recognition” means. It’s like seeing the Nike swoosh without the word “Nike” attached to it, but automatically recognizing what the swoosh means. Brand recognition is seeing the golden arches and recognizing it as a McDonald’s even as you’re driving 70 miles per hour down the freeway. We want your media kit to have brand recognition and to offer the familiarity of your website, your logo, and your social media platforms. The look and feel are all the same no matter where someone sees your content. Consistency is a big deal in how your marketing materials are presented as well as in how you present and share yourself.
You need a professional headshot
One of my favorite movies is Sunset Boulevard, and my favorite line is when Norma Desmond says, “Mr. DeMille, I’m ready for my close-up.” Not everyone is comfortable with a close-up, but it’s necessary. You need a headshot. Why do you need a photo of yourself? Well, people want to connect with people. We are all virtual these days, so we want to connect more now than ever before. We have emails, Zoom calls, and social media, and so it can often feel like there’s no true human connection. Having a headshot helps to create a human-to-human connection. A high-quality headshot is also going to elevate you as someone who is seen as a professional and who understands the podcasting landscape. Your podcast interviews won’t always have a video component to them, so it’s nice for hosts to see who exactly they are going to be talking to, and this is true even if there’s a video component to your interview. This is part of being approachable and familiar.
Every host is going to ask for a headshot, so you might as well have one ready to go. Your headshot will be used for the graphics that hosts will make and share across their platforms (and you’ll share these elsewhere, too), so you’ll want a great headshot. I recommend investing in a professional photographer to take your headshot photo. Many photographers offer headshot packages, and some larger cities have studios specifically for headshots and social media photos. If you aren’t comfortable with having your photo taken, you’re going to need to get used to it. That’s some tough love from yours truly! Trust me when I tell you that once you get that first headshot done, you’ll feel much more comfortable about it.
Please do yourself (and me!) a favor and don’t use the glamor shots you took in the nineties at the mall! Don’t be afraid to wear bold colors minus any crazy patterns that can be distracting. Your background can be outdoors or a mono-colored wall. If you’ve got a professional taking your headshots, then the person should be equipped and prepared with good lighting to ensure you look as natural and comfortable as possible. Some jewelry is fine, but be sure to not overdo it to the point that it takes away from you being the focus of the photo.
Write a two-paragraph bio
We now know what you look like, but we need to include who the heck you are, so you’re going to need a biography of yourself. Don’t worry; this isn’t your autobiography in book form. This isn’t even your life story in a nutshell. It’s a two-paragraph description of who you are and what you do and should include some of your accomplishments and something that allows your personality to shine through.
Your biography should pertain to your experience, education, special accolades, and awards. If you have a company bio or author bio already written, you might be able to utilize that instead of reinventing the wheel. I think it’s a good idea to have consistency wherever you can, including your bio.
If you don’t have a bio already written, don’t stress. Here are some tips for crafting your bio:
- Write it in the third person. This is what a host is going to read to introduce you, so as odd as it may be, write it like you’re talking about someone other than yourself.
- The opening line should include your full name and what you do. For example, mine would say, “Michelle Glogovac is THE Podcast Matchmaker, award-winning publicist, and host of the My Simplified Life podcast.”
- Include two to three sentences about your experience—what you do, what you specialize in, and what type of clients you work with—and about your goal—what you are striving to achieve.
- Create a second paragraph that shares your educational background, the vicinity where you reside, and anything personal you might want to add. Mine includes that I have BA and MS degrees in law; I’m a wife, a mom of “Irish twins,” a stepmom of two adults, and a fur mom; I reside in the Bay Area; and I have a love for wine.
- Don’t be afraid to give your bio some personality and share who you are in it. The goal is to make your bio not only impressive but relatable as well.
Here is an example of a good bio:
A natural leader in work and life, Shana Pereira has an empathic ability to bring people together and the intuition on how to make the impossible possible. With 20 years of experience in marketing and media, in her professional life Shana directs and guides large-scale operating systems that drive cultural engagement, fast growth, and lasting business impact. After a near-death experience during a heart and kidney transplant in 2020, Shana is now channeling her purpose into building a movement, content platform, and research institute around the future of religion and healthcare.
A storyteller, modern-day apostle, and unrelenting optimist, Shana is a sought-after speaker and thought leader sharing her insights and lessons around organ transplantation, the importance of partnership with your medical team, the mental resilience it takes to survive when faced with death, and the emotional impact of having seen the afterlife. Her experiences and speeches move everyone who hears them—guiding people on how to have a better relationship with crisis and, in turn, their own humanity.
A side note: Be sure to update your bio—don’t let it get stale. It’s a good idea to revisit your bio a couple of times a year, although you’ll be sending it out much more frequently when you are doing podcast interviews.
Point to your social media accounts
We can’t forget to include where people can stalk you … I mean find you! Gather your social media handles for where you show up most consistently. Since the actual hyperlinks are lengthy, I like to use the small icon graphics that represent each platform, such as the Facebook logo, Instagram logo, a microphone (if you host a podcast), and so forth. If you are going to use the Canva app (more on that below), you can get these icons ready to go. If you aren’t active on one of these platforms, don’t include it. Each icon will have a hyperlink to your specific social media account, making it clickable and eliminating any need for the host googling you. If you’re using Word or a PDF, you can also hyperlink your social media account handles within the document.
Put it all together
If you’re new to media kit design, don’t worry: Canva is a simple-to-use website where you can design basically anything. Even better is that it has a free option! I recommend downloading a PDF file of your kit and naming it with your name followed by “media kit.” One thing I want you to remember is that this is YOUR media kit. Let it represent you, your personality, and your brand and showcase how amazing you are. You can also use Word, Google Docs, or Adobe to create your media kit. This is about the end product and not about using the right software or needing to learn a new one.

Final word
Your media kit is going to come in very handy because it’s a tool you will utilize in pitching yourself not only to podcasts but to any other type of media or speaking engagement. You’ve just created your one-stop shop that tells people who you are, what you do, and where they can find you!
Hoping to get on podcasts this year? Get a copy of How to Get On Podcasts by Michelle Glogovac.
Michelle Glogovac (San Jose, California), aka THE Podcast Matchmaker™, is an award-winning podcast publicist and host of the My Simplified Life podcast. She matches her clients with the perfect podcast hosts and teaches them how to share their story, vision, and expertise in ways that generate new business opportunities. Michelle speaks on a variety of topics, including PR, entrepreneurship, and life lessons and has interviewed and worked with Emmy Award winners, international bestselling authors, advocates and activists, and many other individuals. She is the founder and CEO of The MLG Collective, a podcast public relations agency.
Good article. Thank you.
The only thing I would add as a writer is that your press kit (or media kit) should also include the book cover, blurb, and buy links for your latest book (or any other books that a writer is actively promoting). Make it easy for media outlets to help you promote your books.
Definitely agree Judy! Since this is an excerpt, the very next page of the actual book has the book cover and links mentioned for authors to include. For client author media kits, I include all of this and a full page on blurbs/praise. Love ensuring no homework for the hosts!
Excellent! I would also add to listen to a few episodes of any podcast you are scheduled to be on for a few reasons. 1) You know what to expect from the host. 2) You can be a good podcast citizen by referring to another interview that host did and something you learned:)
Super useful info! Thank you. I am going to use it to design my own one sheet! I also appreciate the format/layout example you give. I recently created a page sort of like this on my website, but definitely having a document is super helpful!